The Intel Core 2 Quad Q6600 is a nice cpu which is, in most of the cases very easy to overclock. When I talk about overclock, it's not a 10% or 15% overclock, but a 50% overclock.
In this news, I will explain how I have been able to overclock my intel Q6600 from 2,4Ghz to 3,6Ghz safely and with a small investment (no need for a water cooling system).
Overclocking a quad core cpu create a lot of heat. The first thing to do is to insure the system will be able to cool the cpu correctely. To do that, I replaced the stock air cooling system with the OCZ vandetta 2 system:
This cpu cooler has very good cooling capacity, is quite cheap, fits in my case (on the P5N-D motherboard, the cpu is not far away from the PSU and many CPU cooler with 120mm fans can't fit) and is sold in my computer hardware shop. I chose a cooling system with a vertical fan to have a very good air flow in the case.
To be sure the cooling capacity will be used efficiently, I used Arctic Silver 5 thermal grease. OCZ provide a very good one, but my hardware store didn't have it in store.
Now we have the good cooling system, we have to insure it will be correctly supplied with fresh air. Like many people, I have a Sonata III 500 case which is a good one for the price:
Unfortunately, for heavy overclocking, the case do not provide a sufficient air flow. Fortunately, this problem can be fixed very easily, and at a very low cost. Indeed, my system only uses one of the three 5"1/4 bay and none of the two 3"1/2 ones. So I decided to put my dvd player on the top 5"1/4 bay and left all the other bays open to optimize my air flow:
With this solution, the air enter by the front panel, goes directly to the cpu cooling system, and is evacuated by the rear fan. This solution will need you to keep the front door open when your computer is in use. To improve air flow efficiency, I added a 120mm fan at the back of my drive bays.
I fixed it at three points (two on the bottom fan screws and one to the 5"1/4 bay case) using small tie wrap:
This way, the fan if firmly maintained.
Now, we need to install an air filter, to protect our cooling system from dust and make the case not too ugly. To do that, I bought an air conditioner filter foam:
The advantage of this foam is that it will be easy to fix it in the case.
I cut the foam a little bit larger than the drive bays I've to cover. To fix it, it's just necessary to unlock the front of the case. It's not necessary to remove it, just unlocking the top of it is enough. Then I put the foam between the front case and the metal chassis and lock back the front of the case to fix the foam. That's simple, and the result looks like that:
It's not very nice but it's the less expensive solution.
Now, the case is ready, and we just have to configure the bios.
Be careful! Apply the following configuration at your own risk. Any misconfiguration or bad cooling may destroy your system. This is given only as information. It worked for me, but parameters may vary from one computer/CPU to another. I'm not responsible for any damage which may happen to your computer.
Here is my configuration for voltage on my P5N-D motherboard:
Vcore voltage: 1.48750V (value set in the bios)
Dram: auto (I overclock the CPU, not the ram)
HT voltage: 1.48V
NB chipset voltage: 1.48V
SB chipset voltage: 1.60V
For frequency:
FSB-Memory clock mode: unlinked
FSB: 1600 Mhz (with P5N-D it'S 1600, but with other motherboard it can be 400)
Mem: 800 Mhz (no overclock on my 800Mhz ram)
CPU multiplier is kept at x9
Enhanced C1 (C1E) is enabled (disable it at first if you encounter problems)
Speed step is enabled (disable it at first if you encounter problems)
Now, it's time to restart the computer, but before, be sure that your fans are set to run full speed in the bios.
When the system is idle, the temperature of the CPU is 37°C, and the warmest core is at 40°C. You can see that the speedstep option reduce the speed of the CPU to 2.4Ghz when idle. You can see that when idle, the vcore voltage I set at 1.48750V in the bios is at 1.44 in real conditions.
Now, to be sure the system is stable, it's necessary to launch a stress test. Using compression software or any other software not dedicated to stressing the CPU is not efficient. To stress my CPU, I used cpuburn, which is a software provided in ubuntu repositories. This software really stress the cpu and increase the temperature much more than any other software not dedicated to cpu stress test can do. Cpuburn is really the best way to verify if our system is stable. I run one cpuburn for each core. Since I've a modern intel cpu, I run burnP6. After 3 hours of stress test, my system is stabilized to 61°C with the warmest core at 66°C, which is really good, since my cpu will never be so much stressed in normal use.
As you can see, on heavy load, the Vcore voltage dropped to 1.38V.
Debugging:
I'm not an expert in overclocking, but here is my experience regarding this overclock.
I used 1.48750V for the vcore, since with lower voltage, the system had a hard reboot after 20 minutes of stress test.
It worked with 1.5V, but the lower the voltage is, the better it is. Lower voltage will create less heat.
For other voltage, it's a guess I made with all the information I found on internet.
It's possible your system may not work at 3.6Ghz, it really depends on your CPU. You may be lucky or not. For example, I haven't been able to run my system at 3.8Ghz even if the CPU was still quite cool and some people can.
You may need more vcore voltage or less, it depends on your CPU too. Try to lower the voltage as much as possible.
This is more a reminder than a blog... You may find things which can be useful to you... or not... But it doesn't matter.
Wednesday, July 2, 2008
Tuesday, June 3, 2008
Monday, June 2, 2008
How to stop a noisy hard disk with Linux
The hard disk I use to host my Windows is extremely noisy. Furthermore, since I use Ubuntu 99% of the time and nearly never access this hard drive during this time, keeping the disk spinning is absolutely useless.
The simplest way to stop the hard drive is to use sg3-utils.
To install it just use this command:
If you want your hard drive to stop every time you log onto your account, you can add the command to the list of software to start when you log in. However, to be able to do that, you will have to allow you to sudo sg_start without having to enter your password.
To do that if your user name is username then, edit /etc/sudoers and add the line:
The simplest way to stop the hard drive is to use sg3-utils.
To install it just use this command:
sudo apt-get install sg3-utilsNow, if you want to stop the hard drive /dev/sda, use this command:
sudo sg_start --stop /dev/sdaThe disk will restart as soon as you will try to access it.
If you want your hard drive to stop every time you log onto your account, you can add the command to the list of software to start when you log in. However, to be able to do that, you will have to allow you to sudo sg_start without having to enter your password.
To do that if your user name is username then, edit /etc/sudoers and add the line:
username ALL=NOPASSWD:/usr/bin/sg_startTo edit /etc/sudoers you have to make it writable by root, then when you have edited it, do not forget to set it read only for root, and nothing for group and users. If you don't do that, or make an error in suoers file, sudo will no more work. So be carefull, and keep a root shell open while you test if sudo still work.
Sunday, June 1, 2008
nvidia 8800 GT GPU temperature with linux
This modification of nvclock works and is accurate with my video card, but I accept no responsibility for damages this modified software may create. This software and information is provided 'As Is'.
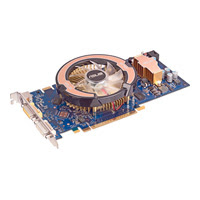
I'm the unlucky owner of an ASUS EN8800GT.
This card basically do the job. However, ASUS has disabled the standard temperature and fan control system to allow only their own ugly software which works only with windows to monitor the card.
Under linux, nvidia-setting software return nothing for temperature. This is disappointing.
Luckily, I found a solution to be able to read, at least the GPU temperature on my Ubuntu Box.
I found that nvclock v0.8 beta3 was able to report a GPU temperature. However, this value is not good. So I modified nvclock to report correctly the temperature. Find below the patch for the file src/backend/nv50.c:
Nicolas (see comment below and thank you for your update) reported that since nvclock 0.8 beta4, a new patch is necessary to provide the good temperature (not -380° or so). Here is the code:
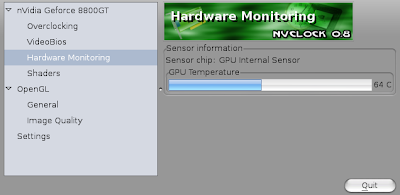
Now, it reports the temperature correctly, and other video cards still work correctly.
The result looks like that:
I hope this is helpful to you.
I'm the unlucky owner of an ASUS EN8800GT.
This card basically do the job. However, ASUS has disabled the standard temperature and fan control system to allow only their own ugly software which works only with windows to monitor the card.
Under linux, nvidia-setting software return nothing for temperature. This is disappointing.
Luckily, I found a solution to be able to read, at least the GPU temperature on my Ubuntu Box.
I found that nvclock v0.8 beta3 was able to report a GPU temperature. However, this value is not good. So I modified nvclock to report correctly the temperature. Find below the patch for the file src/backend/nv50.c:
139a140,146
>
> //Temperature support for G92
> if(( (nv_card->bios->device_id&0xff00) == 0x600)||( (nv_card->bios->device_id&0xff00) == 0x610))
> {
> temp = nv_card->PMC[0x20008/4]&0x3fff;
> return (-13115 + temp) / 18.7 + 1;
> }
Nicolas (see comment below and thank you for your update) reported that since nvclock 0.8 beta4, a new patch is necessary to provide the good temperature (not -380° or so). Here is the code:
--- src/backend/nv50_old.c 2009-01-04 11:46:39.000000000 +0100
+++ src/backend/nv50.c 2009-05-26 14:21:12.000000000 +0200
@@ -229,7 +229,7 @@
printf("divider=%f, offset=%f\n", divider, offset);
}
- temp = nv_card->PMC[0x20008/4] & 0x1fff;
+ temp = nv_card->PMC[0x20008/4] & 0x3fff;
return (int)(temp + offset)/divider;
}
Now, it reports the temperature correctly, and other video cards still work correctly.
The result looks like that:
I hope this is helpful to you.
Saturday, May 31, 2008
How to convert your video to work on your IPod in one click with linux (Gnome)
This tutorial has been done with Ubuntu 8.04 .
The problem with Ubuntu 8.04 is that ffmpeg doesn't support aac encoding by default. So we will have to compile it with support for aac.
First of all, verify that ffmpeg is not installed on your computer. If it'S installed, please, uninstall it using synaptic.
Now, open a terminal, and execute the following commands:
Now, go in ffmpeg source folder folder:
Now, it's time to compile ffmpeg with the following commands:
If everything went well, now ffmpeg is installed on your computer with support for aac.
To allow you to convert films to mp4 supported by an IPod in a single click, you need to do the following.
First, verify that zenity is installed by running the following command:
Then, run the following command to create and edit the script used to convert vidoes in 4:3:
Now, close the editor and run the following command to make the file executable:
To create the script which convert fils in 16:9 format, run the following commands:
Now, close the editor and run the following command to make the file executable:
To convert a video, just right click on your video file, then left click, then go to scripts option, and choose one of the two scripts.
The you will see the conversion progress:
You can select several videos at the same time to make a batch conversion.
Now, to put your new video on your Ipod, just use gtkpod.
The problem with Ubuntu 8.04 is that ffmpeg doesn't support aac encoding by default. So we will have to compile it with support for aac.
First of all, verify that ffmpeg is not installed on your computer. If it'S installed, please, uninstall it using synaptic.
Now, open a terminal, and execute the following commands:
sudo apt-get build-dep ffmpeg
sudo apt-get install liblame-dev libfaad-dev libfaac-dev libxvidcore4-dev libx264-dev liba52-0.7.4 liba52-0.7.4-dev
sudo apt-get source ffmpeg
Now, go in ffmpeg source folder folder:
cd ffmpeg-0.cvs20070307/
Now, it's time to compile ffmpeg with the following commands:
sudo ./configure --enable-gpl --enable-libogg --enable-liba52 --enable-dc1394 --enable-libgsm --disable-debug --enable-libmp3lame --enable-libfaad --enable-libfaac --enable-xvid --enable-pthreads --enable-x264
sudo make
sudo checkinstall -D make install
If everything went well, now ffmpeg is installed on your computer with support for aac.
To allow you to convert films to mp4 supported by an IPod in a single click, you need to do the following.
First, verify that zenity is installed by running the following command:
sudo apt-get install zenity
Then, run the following command to create and edit the script used to convert vidoes in 4:3:
gedit "~/.gnome2/nautilus-scripts/Ipod Video 4:3"Then copy the following script in the editor and save the content:
#!/bin/bashSince I have a quad core GPU, I use the option -threads 3 to use 3 cores. Change the value to 1 or 2 if you have one or two cores.
IFS='
';
# List all files
count=0;
for f in $NAUTILUS_SCRIPT_SELECTED_FILE_PATHS;
do
count=$(($count+1));
done
pos=0;
for file in $NAUTILUS_SCRIPT_SELECTED_FILE_PATHS;
do
pos=$(($pos+1));
name=${file##*/}
ffmpeg -threads 3 -y -i "$file" -f mp4 -vcodec mpeg4 -maxrate 700000 -b 700000 -qmin 3 -qmax 5 -bufsize 4096 -g 300 -acodec aac -ab 192 -s 320x240 -aspect 4:3 "$file.mp4" 2>&1 | perl -ne '$/="\r";$| = 1;if (/Duration: (\d+):(\d+):(\d+)/) { $max=($1*3600+$2*60+$3) }; if (/time=(\d+)/) { printf "%d\n",($1/$max*100);} print STDERR $_;'| zenity --progress --auto-close --title="$name" --text="File $pos/$count" --percentage=0
done
Now, close the editor and run the following command to make the file executable:
chmod 700 "~/.gnome2/nautilus-scripts/Ipod Video 4:3"
To create the script which convert fils in 16:9 format, run the following commands:
gedit "~/.gnome2/nautilus-scripts/Ipod Video 16:9"Then copy the following script in the editor and save the content:
#!/bin/bashSince I have a quad core GPU, I use the option -threads 3 to use 3 cores. Change the value to 1 or 2 if you have one or two cores.
IFS='
';
# List all files
count=0;
for f in $NAUTILUS_SCRIPT_SELECTED_FILE_PATHS;
do
count=$(($count+1));
done
pos=0;
for file in $NAUTILUS_SCRIPT_SELECTED_FILE_PATHS;
do
pos=$(($pos+1));
name=${file##*/}
ffmpeg -threads 3 -y -i "$file" -f mp4 -vcodec mpeg4 -maxrate 700000 -b 700000 -qmin 3 -qmax 5 -bufsize 4096 -g 300 -acodec aac -ab 192 -s 320x180 -aspect 16:9 "$file.mp4" 2>&1 | perl -ne '$/="\r";$| = 1;if (/Duration: (\d+):(\d+):(\d+)/) { $max=($1*3600+$2*60+$3) }; if (/time=(\d+)/) { printf "%d\n",($1/$max*100);} print STDERR $_;'| zenity --progress --auto-close --title="$name" --text="File $pos/$count" --percentage=0
done
Now, close the editor and run the following command to make the file executable:
chmod 700 "~/.gnome2/nautilus-scripts/Ipod Video 16:9"
To convert a video, just right click on your video file, then left click, then go to scripts option, and choose one of the two scripts.
The you will see the conversion progress:
You can select several videos at the same time to make a batch conversion.
Now, to put your new video on your Ipod, just use gtkpod.
Friday, May 30, 2008
My new computer
A few times ago, I bought a new computer. I didn't invest more than 150$ in a computer for years (7 at least), except when I bought two new 22" Flat screens in November 2007. So it is a major change to me.
My config is quite a standard one:
My old computer (I bought it one year ago for 150$) is now used as Mythtv backend and frontend for my TV and videoprojector.
The config is:
My config is quite a standard one:
- Asus P5N-D motherboard
- Intel Core 2 Quad Q6600 (easy to over clock in case it becomes necessary)
- 4GB of DDR2 800 (much more than necessary since I use less than 10% in everyday use)
- Asus Nvidia 8800 GT PCIE video card (don't buy this one choose a 8800GT from any other supplier. I will explain why later)
- Antec Sonata III (silent, good power supply and low price)
- 750 GB Seagate hard drive
- A hold 70GB hard drive
- Simple DVD player/writer from LG (no need for Blue Ray at this time)
- Microsoft Confort Curve 2000 keyboard (it's the keyboard I prefer for typing)
- Logitech G5 v2 mouse
- Ubuntu 8.04 as main operating system (on the 750 GB hard drive)
- Windows Vista Ultimate (just in case and for gaming) (on the 70GB hard drive)
My old computer (I bought it one year ago for 150$) is now used as Mythtv backend and frontend for my TV and videoprojector.
The config is:
- AMD Athlon 2500+ with quite big and silent heatsink
- 1GB of ram
- 500 GB hard drive (I bought a new one because I need a lot of space for recorded programs, and it's more silent)
- I added a hauppauge PVR 150 with Windows media center remote and receiver (I'm desappointed since I find the image very blurred)
- Nvidia 6600 GT AGP (disappointing since most of passive fans on the market do not support this card)
- everything is in a unkown box..
- Mythbuntu is the operating system. I made some configurations to allow the computer to stop and restart automatically to record programs
Subscribe to:
Posts (Atom)